
Creating a show-stopping dessert that doubles as edible art is every baker’s dream. Enter the Piano Cake Made With Kit Kat Bars, a whimsical confection that transforms a classic layered cake into a miniature grand piano, complete with realistic black-and-white keys crafted from crisp chocolate wafers. This dessert not only delights the eyes but also celebrates the joy of music and the sweet nostalgia of Kit Kat bars. In this detailed guide, you’ll discover every step—from initial inspiration to the final flourish—for building your very own edible instrument. Whether you’re celebrating a pianist’s birthday, hosting a music-themed party, or simply craving a creative baking challenge, this tutorial has you covered. Along the way, you’ll learn pro tips for flawless cake layers, foolproof frosting techniques, and inventive decoration ideas to take your piano cake to the next level. Let’s strike the perfect note with our Piano Cake Made With Kit Kat Bars!

Inspiration Behind the Piano Cake Made With Kit Kat Bars
The idea for the Piano Cake Made With Kit Kat Bars sparkles at the intersection of culinary craftsmanship and musical passion. Imagine the sleek silhouette of a grand piano, its polished curves, and stately form, reimagined in cake form. Pair that visual with the familiar crunch of Kit Kat bars—and you have an irresistible centerpiece that tells a story in both taste and design. This fusion of sweet and sophisticated appeals to musicians, dessert enthusiasts, and anyone who craves a memorable twist on tradition. Drawing inspiration from concert halls, pastry shops, and viral baking videos, this cake celebrates creativity and attention to detail. From the ebony ‘keys’ to the ivory fondant finish, each element contributes to a harmonious dessert that’s as fun to build as it is to devour.
Materials and Ingredients
To bring the Piano Cake Made With Kit Kat Bars to life, you’ll need the following:
Cake & Filling
- 3 cups cake flour (spooned and leveled)
- 2½ cups granulated sugar
- 1½ cups unsalted butter, room temperature
- 6 large eggs, room temperature
- 1 cup whole milk, warmed
- 2½ teaspoons baking powder
- ½ teaspoon salt
- 2 teaspoons pure vanilla extract
- 1 cup fruit jam or pastry cream (optional filling)

Frosting & Fondant
- 4 cups powdered sugar
- 1½ cups unsalted butter, room temperature
- ¼ cup heavy cream
- 1 teaspoon vanilla extract
- Black and white fondant (or 1 pound white + black gel coloring)
- Edible silver or gold paint (optional for accents)
Kit Kat Piano Keys
- 2 standard packs of Kit Kat bars (minis or full-size, depending on scale)
- Sharp knife for clean slicing
Tools & Equipment
- Two 9×13-inch cake pans
- Offset spatula and bench scraper
- Rolling pin and silicone mat
- Sharp paring knife
- Piping bags and round tips
- Cake board or sturdy serving platter
- Ruler or straight edge for precision

Preparing the Cake Base: Piano Cake Made With Kit Kat Bars
Preheat and Prep: Preheat your oven to 350°F (175°C). Grease and flour two 9×13-inch pans, tapping out excess flour.
Cream Butter and Sugar: In a stand mixer fitted with the paddle attachment, beat 1½ cups of butter with the sugar on medium-high for 3–4 minutes until pale and fluffy. This step introduces air for a light crumb.
Incorporate Eggs: Add eggs one at a time, beating well after each. Scrape down the bowl to ensure even mixing. Add vanilla extract with the final egg.
Combine Dry Ingredients: In a separate bowl, whisk together the flour, baking powder, and salt.
Alternate Milk and Flour: With the mixer on low, add the dry ingredients in three additions alternating with warmed milk: flour, milk, flour, milk, flour. Stop mixing as soon as the batter looks uniform.
Divide and Bake: Divide batter evenly between pans, smoothing the tops. Bake for 25–30 minutes or until a toothpick comes out clean near the center. Rotate pans halfway for even baking.
Cool Completely: Allow cakes to rest for 10 minutes in pans, then invert onto wire racks and cool fully before trimming or stacking.
Baking Perfect Cake Layers
Achieving consistently flat, even cake layers is essential for a structurally sound Piano Cake Made With Kit Kat Bars. Follow these best practices:
Use Cake Strips: Soak reusable fabric cake strips in cold water and wrap around pans to minimize doming.
Even Batter Distribution: Weigh batter to ensure both pans hold the exact same amount.
Pan Prep: Line the bottoms with parchment and nonstick spray for effortless release.
Test Early: Check doneness 5 minutes before the recipe’s stated time to prevent overbaking.
Leveling: Once cooled, use a serrated knife or leveler to trim any slight dome, creating perfectly flat surfaces. Flat layers stack cleanly and reduce structural stress when carving the piano shape.

Crafting the Piano Shape: Piano Cake Made With Kit Kat Bars
With two rectangular cake layers on your work surface, it’s time to carve:
Mark Your Template: Draw a half-oval shape on parchment or acetate that mimics the curved lid of a grand piano. Size the outline to your cake’s dimensions.
Layer and Chill: Stack one cake layer atop the other with a thin filling layer if desired. Wrap tightly in plastic and refrigerate for 30 minutes to firm up.
Trace and Cut: Place your template over the chilled cake. Use a sharp paring knife to cut along the outline, removing excess cake. Keep scraps for cake pops or trimmings.
Create the Keyboard Section: From the trimmed-off pieces, cut a rectangle extending from one straight edge of the piano body—this becomes the keyboard section.
Support the Structure: Insert two dowels or plastic straws through the cake’s base to provide extra support under the keyboard portion. Cut them flush to the cake surface.
Assembling the Piano Cake Made With Kit Kat Bars
Assembly demands precision to maintain the piano’s signature form:
Crumb Coat: Apply a thin layer of buttercream over the entire cake to lock in crumbs. Chill until the frosting is firm, about 15–20 minutes.
Final Layer: Smooth on a second, thicker coat of frosting, paying special attention to crisp edges where the body curves into the keyboard section. Use an offset spatula and bench scraper for clean lines.
Edge Sharpness: Dip your bench scraper’s edge in hot water, dry, and run along the borders to sharpen angles. Repeat as needed for a polished look.
Decorating with Frosting and Edible Accents
Now that your cake is frosted, it’s time to add decorative flourishes:
Fondant Cover: Roll out white fondant to about 1/8-inch thickness. Drape over cake and smooth with a fondant smoother, trimming excess at the base.
Black Accents: Roll black fondant strips for the piano’s trim around the body and keyboard border. Adhere with a light smear of water or edible glue.
Lid Details: Use edible silver paint or finely chopped sparkle dust to highlight hinges and handle accents on the piano lid.
Music Notes: Cut tiny musical note shapes from black fondant or pipe them on with thinned black buttercream for an artistic touch.

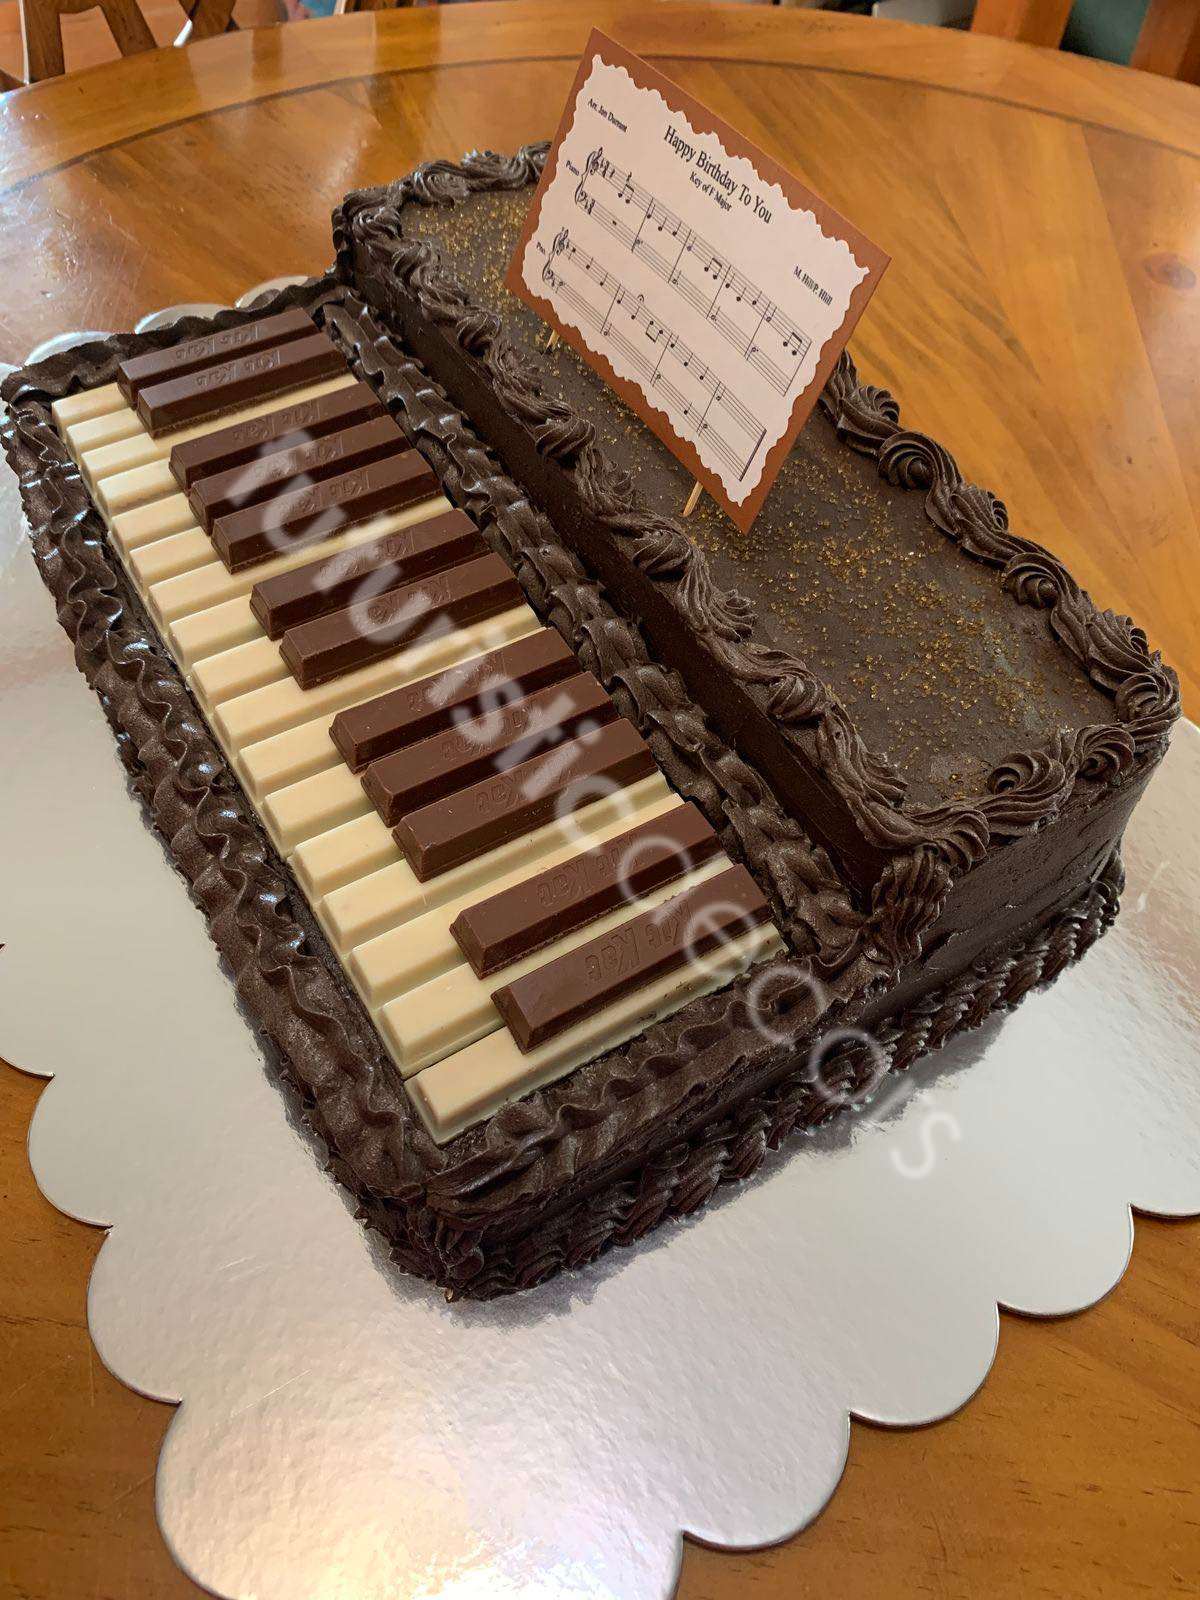
Installing the Kit Kat Bars to Form Keys
The showpiece of the Piano Cake Made With Kit Kat Bars is, of course, the realistic keys:
Select the Bars: If using full-size Kit Kat bars, break them into individual fingers. Minis can be used whole for a scaled-down piano.
Measure Key Spacing: Use a ruler to mark equal intervals on the keyboard section. Standard pianos have 88 keys, but for a cake model, 20–25 keys create a convincing effect.
Attach the Keys: Gently press each Kit Kat finger into the frosting along your marks. Alternate white (plain wafers) and black keys—cut black fondant strips to form sharps/flats, placing them atop the corresponding white keys.
Secure in Place: If any bars feel loose, anchor them with a dab of buttercream at the base. Step back to ensure keys align perfectly in rows.
Refer to buy similar products: Click here
Variations and Creative Twists: Piano Cake Made With Kit Kat Bars
Elevate your Piano Cake Made With Kit Kat Bars with personalized flair:
- Chocolate Lovers’ Edition: Replace white fondant with dark chocolate ganache for a rich mahogany finish. Use white chocolate Kit Kat bars for the keys.
- Fruit-Filled Surprise: Incorporate raspberry, passionfruit, or lemon curd between layers for a burst of tangy flavor that contrasts the sweet vanilla base.
- Mini Piano Cupcakes: Scale down the design onto cupcakes—use mini Kit Kats or wafer rolls for keys and small fondant sheet strips for decorations.
- Edible Sheet Music: Print custom edible paper with musical scores and affix around the cake’s sides for a concert-stage ambiance.
- Themed Color Palette: Match wedding or party colors by tinting fondant and buttercream in pastel or jewel tones while retaining the dramatic Kit Kat key effect.

Serving, Storage, and Shelf Life
To ensure your Piano Cake Made With Kit Kat Bars stays fresh and delightful:
- Serving: Use a sharp, warmed knife to slice clean pieces. Guide guests to cut between keys for consistent slices.
- Temperature: Serve at room temperature for optimal flavor—remove from the refrigerator 1 hour before serving.
- Storage: Cover loosely with plastic wrap and refrigerate for up to 4 days. Bring to room temperature before slicing.
- Freezing: Individual slices can be frozen in airtight containers for up to 1 month. Thaw overnight in the refrigerator, then return to room temperature before serving.
- Avoid Humidity: High humidity can soften Kit Kat bars and fondant. If storing in humid climates, add silica gel packs (food-safe) around the platter outside of direct cake contact.
Nutritional Information & Dietary Adjustments
While this is undeniably an indulgent dessert, you can modify ingredients to suit dietary needs:
| Component | Standard Recipe (per slice) | Lighter Option |
|---|---|---|
| Calories | ~450 kcal | Use sugar substitute & light buttercream (~300 kcal) |
| Fat | 25 g | Substitute half the butter with applesauce (reduces to ~15 g) |
| Sugar | 40 g | Swap granulated sugar for erythritol (1:1 ratio) |
| Dairy | Yes | Use plant-based milk and vegan buttercream |
| Gluten | Yes | Use 1:1 gluten-free flour blend |
Gluten-Free Variant: Replace cake flour with a blend of rice flour, potato starch, and tapioca starch, and add 1 teaspoon of xanthan gum.
Vegan Adaptation: Use flax “eggs” (1 Tbsp ground flax + 3 Tbsp water each), coconut oil in place of butter, and aquafaba buttercream (whipped chickpea brine).
Scaling for Larger Events: Piano Cake Made With Kit Kat Bars
To serve a crowd at recitals or wedding receptions, you can scale up your Piano Cake Made With Kit Kat Bars:
Multiple Pianos: Create 2–3 smaller pianos (8×8-inch bases) rather than one massive cake. This speeds baking and transport.
Sheet-Style Cake: Bake in 12×18-inch half-sheet pans. Carve the piano top and keyboard onto the sheet, then use fondant cutouts and multiple packs of Kit Kats to cover a larger keyboard.
Tiered Piano Display: Stack three decreasing sizes (12×18, 9×13, 6×9 inches) to create a grand “wedding cake” piano. Use dowels between tiers for stability and proportionally more Kit Kats.
Packaging, Transport, and Display
Transporting an elaborate cake requires care:
Chill Before Transit: Refrigerate the assembled cake for at least 2 hours so the frosting and fondant firm up.
Secure in Box: Use a cake box that’s 2 inches taller than your cake. Place non-slip mat under the cake board.
Avoid Heat & Vibration: In hot climates, keep air conditioning on, or use a portable cooler with ice packs around (not touching) the cake box.
On-Site Assembly: For very large or intricate pianos, consider transporting body and keyboard separately and assemble décor (Kit Kats, music notes) at the venue.
Frequently Asked Questions: Piano Cake Made With Kit Kat Bars
Q1: Can I use other chocolates instead of Kit Kat bars?
A: Absolutely. Wafer-based chocolates like Nestlé Crunch or Hershey’s Cookies ‘n’ Creme bars give a similar shape. For a premium look, use couverture chocolate bars and pipe thin stripes of white chocolate as faux keys.
Q2: What’s the best way to store leftover cake slices?
A: Wrap each slice tightly in plastic wrap, then foil, and refrigerate up to 4 days or freeze up to 1 month. Thaw in the fridge overnight.
Q3: How do I prevent air bubbles under fondant?
A: Roll fondant over a surface lightly dusted with cornstarch, and smooth from center outward using a fondant smoother to push out bubbles. Poke stubborn bubbles with a pin and smooth gently.
Q4: Can I make this cake dairy-free?
A: Yes. Use dairy-free butter/margarine and non-dairy milk (e.g., oat or almond). Swap heavy cream in buttercream for full-fat coconut milk.
Q5: How do I keep the cake stable if the event is outdoors?
A: Keep the cake shaded in a tent or covered area. Use thicker buttercream or ganache to resist melting, and consider smaller individual servings (cupcakes) if temperatures exceed 80 °F (27 °C).
Conclusion” Piano Cake Made With Kit Kat Bars”
The Piano Cake Made With Kit Kat Bars is more than just a dessert—it’s a symphony of flavor and design that captures the imagination. From the crisp snap of each Kit Kat key to the silky buttercream and tender cake layers beneath, this confection delights both the eyes and palate. Whether you’re a seasoned baker seeking a new challenge or a music lover eager to celebrate in style, this guide offers all the tools, techniques, and creative inspiration you need. So gather your ingredients, turn on some classical tunes, and embark on a baking journey that hits all the right notes. Here’s to your masterpiece: a cake that’s as memorable as your favorite melody!


