
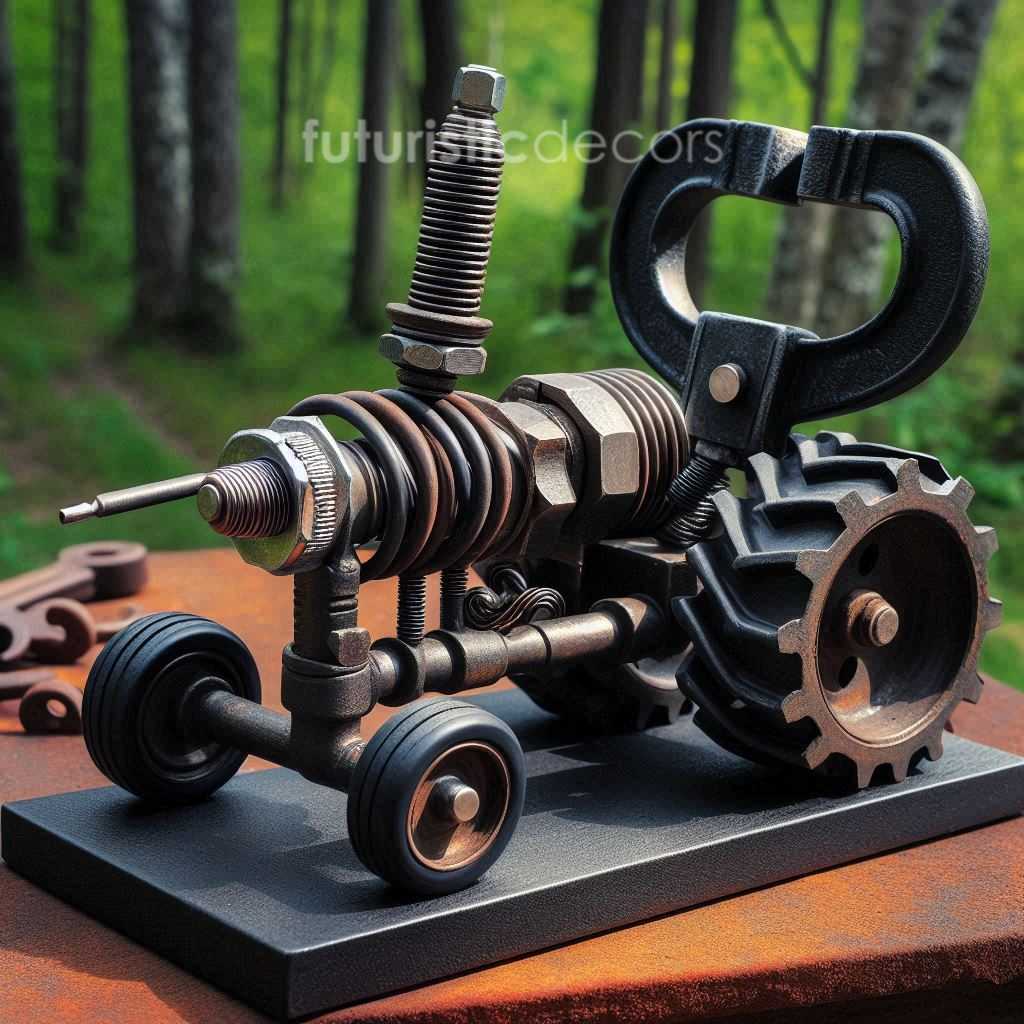
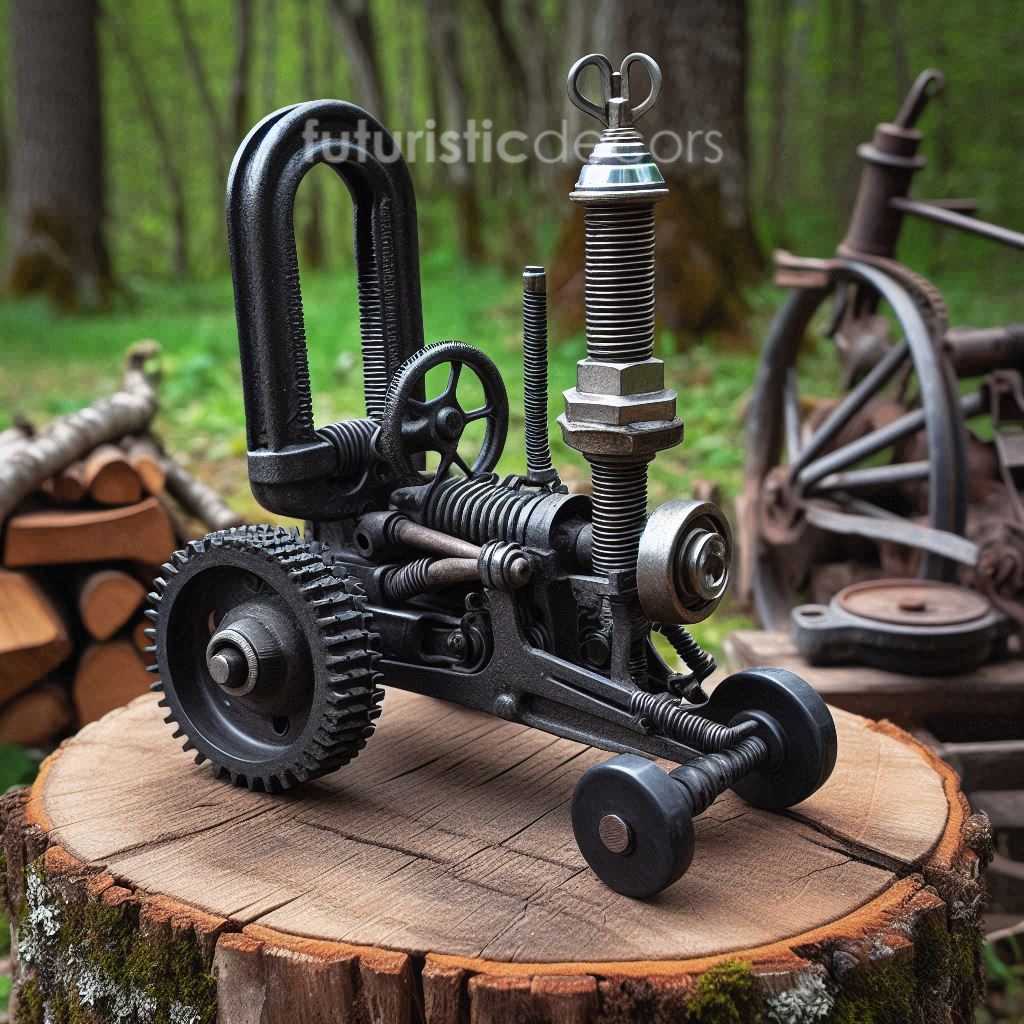
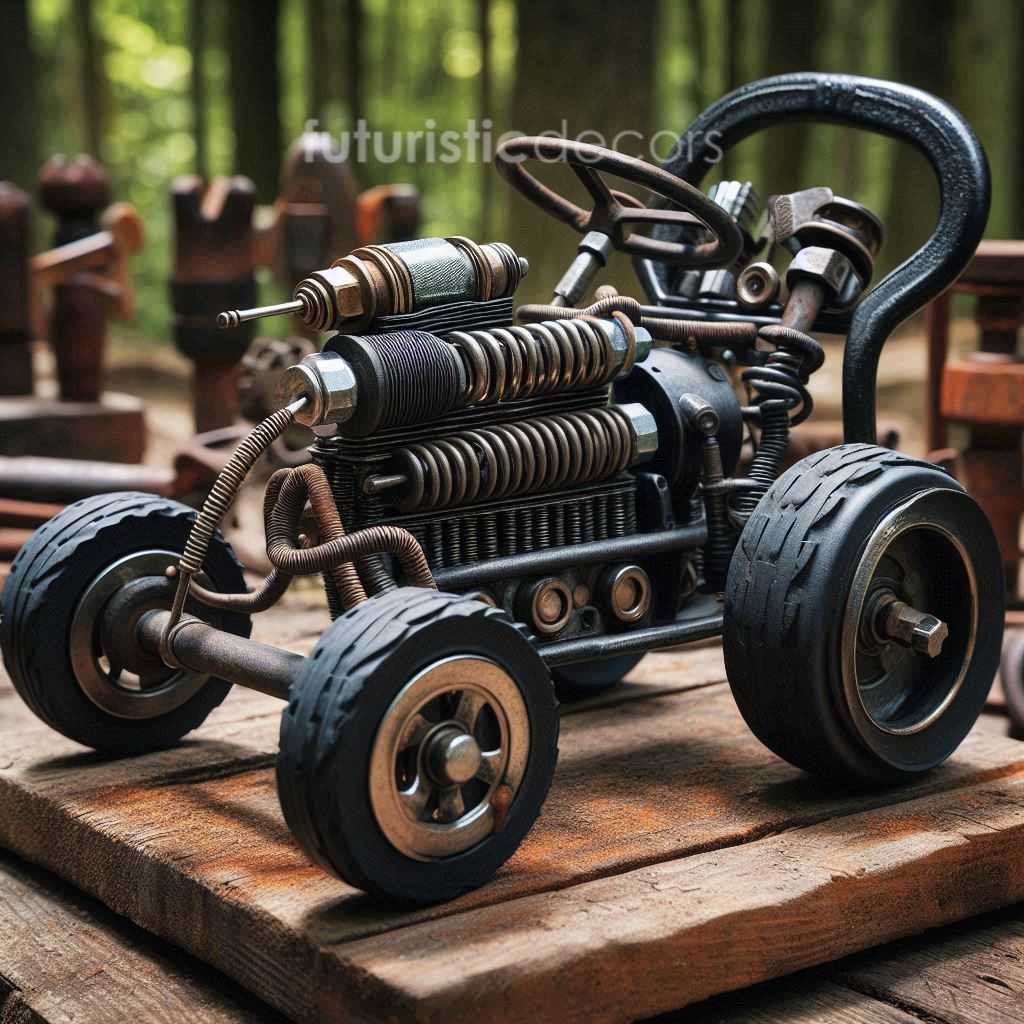
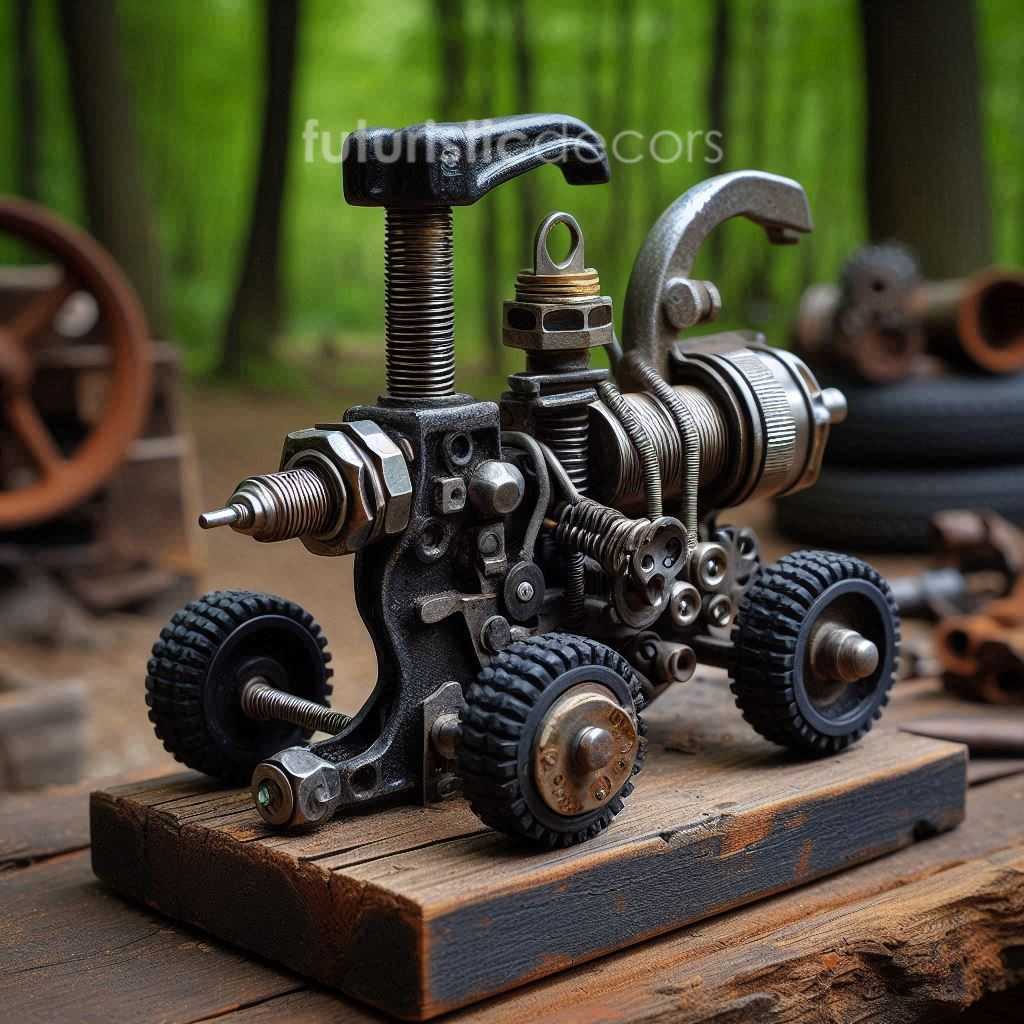
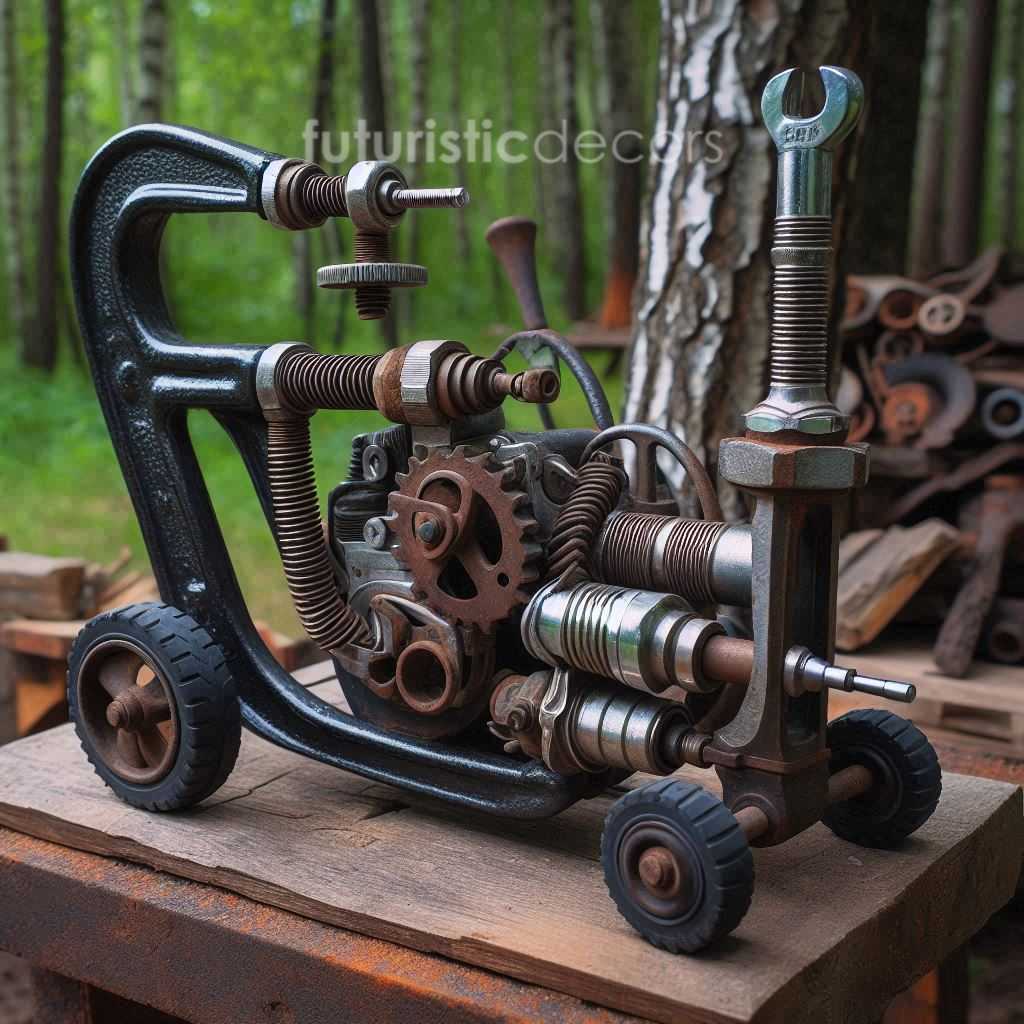
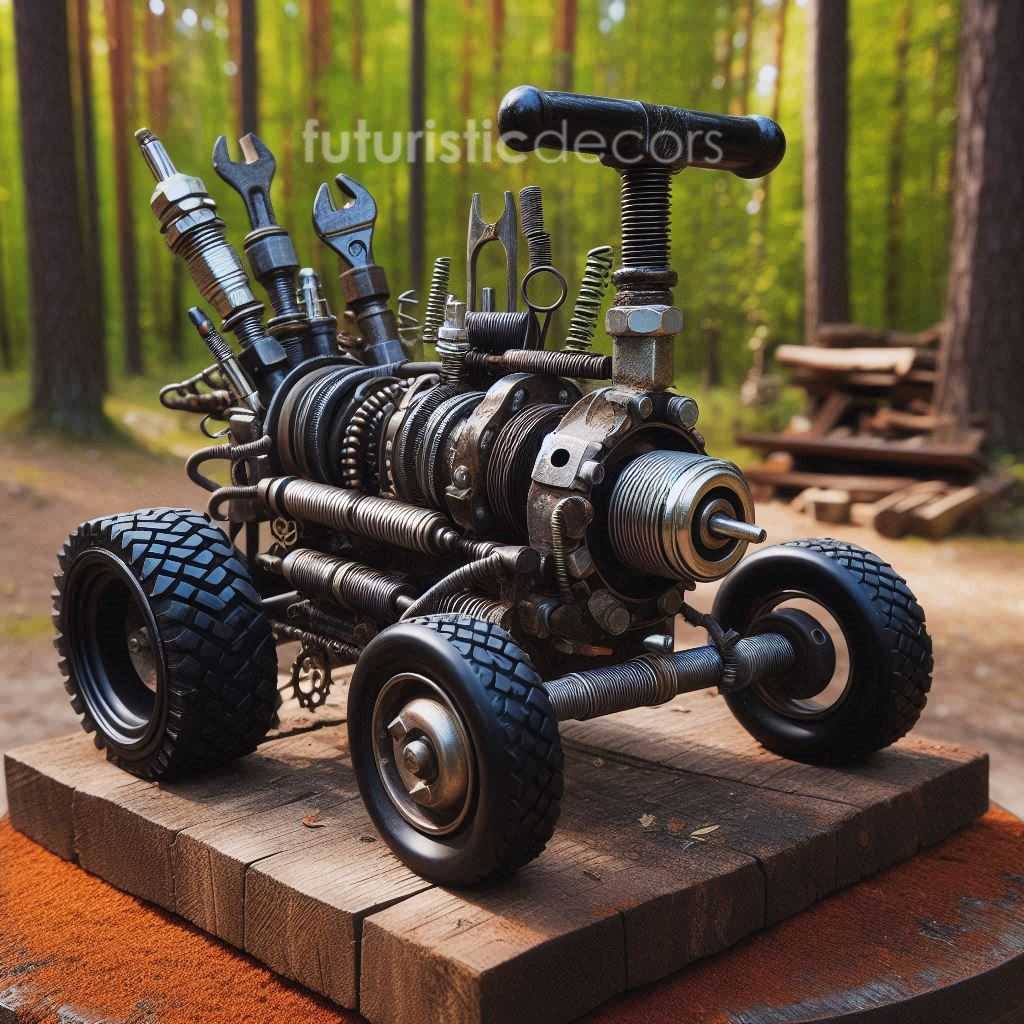
In the world of upcycled sculpture, few pieces capture the imagination like the C-clamp tractor. Merging industrial hardware—such as C-clamps, coil springs, spark plugs, and repurposed metal parts—this miniature tractor embodies the perfect blend of mechanical ingenuity and artistic flair. Whether displayed on a workshop shelf or featured in a modern loft, the C-clamp tractor transforms everyday tools into a statement piece that celebrates craftsmanship, sustainability, and industrial heritage.
In this comprehensive article, we’ll dive into the inspiration behind this unique art form, walk through the materials and tools you need, explore a step-by-step construction guide, examine finishing techniques, and share styling ideas and FAQs. By the end, you’ll have everything required to build your own C-clamp tractor masterpiece or adapt the concept to suit your creative vision.
1. Design Inspiration & Concept: C-clamp Tractor
Art born from reclaimed hardware often conveys a narrative of transformation—turning discarded scraps into objects of beauty. The C-clamp tractor concept originated from a fascination with vintage farm machinery and a desire to repurpose surplus workshop components. Key inspirational elements include:
- Industrial Aesthetic: The raw patina of aged metals, threaded textures of clamp screws, and coiled geometry of springs evoke a rugged, factory-floor vibe.
- Mechanical Metaphor: Tractor wheels represented by heavy flanges or old gears, bumpers and fenders crafted from clamp handles, and spark plugs serving as lifelike engine cylinders all highlight form meeting function.
- Eco-Friendly Artistry: Salvaging used C-clamps, bent pipe clamps, coil springs, and worn-out spark plugs reduces landfill waste and honors the ethos of upcycling.
By leaning into these ideas, the C-clamp tractor becomes more than a model—it’s a tribute to the mechanics that power agricultural history and the creativity that breathes new life into discarded objects.

2. Materials & Tools Checklist
Before embarking on your C-clamp tractor project, gather the following supplies. While alternative items can be substituted based on availability, these components are recommended for structural integrity and visual impact:
Core Components
C-Clamps (3–5 sizes):
One medium to large C-clamp (for the tractor body frame)
Two smaller C-clamps (for front axle/fenders or rear chassis)
Coil Springs (2–3):
Compression springs salvaged from machinery or purchased new
Spark Plugs (1–2):
Standard automotive spark plugs for the “engine” assembly
Metal Wheels/Wheel Replicas (2–4):
Antique gear wheels, flange plates, or repurposed skateboard bearings
Assorted Metal Brackets & Clamps:
U-bolts, small pipe clamps, and metal strapping for axles and roll bars
Supplemental Hardware
Threaded Rods & Nuts (various lengths)
Bolts, Washers & Locknuts
Small Metal Plates or Sheet Metal (for seat, grille, fenders)
Tools & Equipment
Welder (MIG or TIG recommended)
Angle Grinder (cutting and grinding discs)
Drill Press or Hand Drill (with metal bits)
Metal Files & Deburring Tools
Bench Vise
Clamps & V-Blocks (for temporary alignment)
Safety Gear: welding helmet, gloves, safety glasses, ear protection
Paint Supplies: primer, high-heat spray paint or powder coat
3. Step-by-Step Construction Guide: C-clamp Tractor
3.1 Preparing the C-Clamps
Select Your Main Frame Clamp
Choose a robust C-clamp for the central chassis. Ensure the throat depth accommodates wheel spacing and allows room for springs.
Clean & Deburr
Remove rust and paint using an angle grinder with a wire cup brush. File sharp edges and burrs for safety and weldability.
Mock-Fit Front & Rear Clamps
Temporarily position smaller C-clamps at the front (steering axle) and rear (wheel mounts) using bench vise alignment or V-blocks.
3.2 Fabricating the Axles
Cut Threaded Rods
Measure and cut two identical lengths of threaded rod. One will serve as the front axle; the other as the rear.
Attach Wheels
Slide wheels, gears, or flange plates onto the rods. Use washers and locknuts to secure and maintain wheel separation and alignment.
Weld Axles to Clamps
Position each end of the rod into the C-clamp swivel holes or welded bracket. Tack-weld first, check alignment, then finish welds for strength.
3.3 Building the Engine Assembly
Spark Plug Cylinder Bank
Arrange spark plugs side by side on a small metal plate or bracket. Weld them in place at a slight forward tilt to mimic an inline engine.
Spring Intake Manifold
Weld coil springs behind or above spark plugs to represent the intake manifold. The springs’ coils add a playful, mechanical texture.
Mounting to Chassis
Weld the assembled engine block onto the clamp’s top jaw or body. Reinforce with gussets if needed for stability.
3.4 Steering & Seat Components
Steering Column
Use a long bolt or small metal tube as a steering column. Weld a bent piece of metal at the top to form handlebars or a steering wheel.
Driver’s Seat
Cut and shape a small piece of sheet metal or use a scrap bracket. Weld to the rear clamp jaw or a custom support strut.
3.5 Welding & Reinforcement
Tack Weld, Then Final Weld: Tack all pieces in place before committing to full welds to ensure proper fit and alignment.
Gussets & Braces: Add small triangular gussets at high-stress joints (e.g., wheel mounts) for added durability.
Clean Welds: Grind down rough weld beads for a polished look, but leave enough texture to maintain the industrial character.
4. Finishing Touches & Surface Treatment
4.1 Surface Preparation
Degreasing: Use a commercial degreaser to remove oil, grease, and welding flux.
Sanding/Blasting: For a uniform finish, sand or media-blast the entire assembly to achieve a consistent profile.
4.2 Priming & Painting
Primer: Apply a metal-etching primer to promote paint adhesion and corrosion resistance.
Color Scheme:
Classic Farm Green or Red: Evokes vintage tractor aesthetics.
Matte Black or Gunmetal: Emphasizes industrial chic.
High-Heat Spray Paint: Opt for high-heat–rated paint if your piece will sit in an environment exposed to welding splatter or direct sunlight.
4.3 Optional Highlighting
- Dry Brushing: Lightly brush silver or rust-colored paint on raised edges to simulate wear and tear.
- Rust Patina: Use a DIY ferric chloride solution or specialized patina spray for an authentic aged look.
- Clear Coat: A matte or satin clear coat seals in your finish while preserving the tactile metal feel.
5. Display & Styling Ideas: C-clamp Tractor
Once complete, your C-clamp tractor sculpture can serve as an eclectic focal point. Here are creative display options:
Workshop Showcase
Position on a reclaimed wood shelf alongside antique wrenches and gauges for a curated mechanic’s vignette.
Office Desk Accent
Use as a paperweight or conversation starter atop an executive desk—especially fitting for engineers, machinists, or automotive enthusiasts.
Loft or Living Room Art
Place on a floating metal shelf against an exposed brick wall for an industrial modern appeal.
Garden Patio Feature
Seal with weatherproof clear coat and display on an outdoor metal table. The sculpture’s rugged charm complements potted succulents or vintage lanterns.
Gift for Gearheads
Pack in a wooden crate with a custom tag. Ideal as a birthday or retirement gift for anyone who loves tractors, tools, or steampunk art.
Link to buy similar products: Click here
6. Variations & Customization: C-clamp Tractor
The beauty of the C-clamp tractor concept is its adaptability. Consider these customization ideas:
- Scale Adjustments: Build miniaturized tabletop versions or larger “desk-to-floor” models by selecting appropriately sized clamps and springs.
- Theme Tweaks: Incorporate themed hardware—e.g., motorcycle brake springs, car hood ornaments, or bicycle chain sprockets.
- Lighting Elements: Install LED modules behind the grille or wheels to add glow effects. Tiny flickering LEDs inside spark plug sockets evoke engine ignition.
- Functional Add-Ons: Integrate a small clock mechanism into the wheel hub for a practical timepiece sculpture.
- Mixed Media: Combine wood, leather, or acrylic components to contrast metal textures. A leather-wrapped seat adds a touch of modern luxury.
7. Maintenance & Care
While the C-clamp tractor is robust, regular upkeep ensures its longevity and appearance:
- Dusting: Wipe down with a soft microfiber cloth every few weeks.
- Rust Prevention: Inspect weld seams for surface corrosion. Touch up primer and paint as needed.
- Tightening Hardware: Periodically check any non-welded nuts, bolts, or clamps to ensure they remain secure.
- Avoid Moisture: If displayed outdoors, bring indoors during heavy rain or winter to prevent accelerated rusting.
8. Frequently Asked Questions: C-clamp Tractor
Q1: Can I build a C-clamp tractor without welding equipment?
A: Yes! For a non-welded version, use high-strength metal epoxy or threaded fasteners (bolts, nuts, and lock washers). Pre-drill holes in clamps and brackets, then assemble the structure using through-bolts. Although less permanent than welding, this method allows for adjustments and part swaps.
Q2: What size C-clamps work best for a tabletop sculpture?
A: For a desktop-sized model (approx. 6–8 inches long), use a medium C-clamp with a 3–4 inch throat depth as your main frame. Supplement with 1–2 inch mini clamps for axles and minor details.
Q3: Where can I source vintage springs and spark plugs?
A: Check automotive recycling centers, local swap meets, or online marketplaces like eBay. Hardware stores often carry coil springs in various gauges. Repurposed spark plugs can also be ordered in bulk from salvage yards.
Q4: How do I achieve an authentic rust patina on steel?
A: After painting, apply a diluted hydrochloric acid or ferric chloride solution to exposed steel surfaces. The chemical reaction accelerates oxidation, resulting in a natural rust finish. Seal with matte clear coat to preserve the patina.
Q5: Is the C-clamp tractor safe for children’s rooms?
A: Due to sharp metal edges and small parts, this sculpture is best kept out of reach of young children. However, with rounded edges, secure fastening, and a protective clear coat, it can become a safe and striking decor piece in a teen’s or adult’s space.
9. Advanced Techniques & Pro Tips
9.1 Precision Welding for Clean Lines
- TIG vs. MIG: TIG welding affords greater control and a finer bead—ideal for small-diameter springs and spark plug brackets—while MIG welding works faster on heavy C-clamp jaws. If you own both, use TIG for aesthetic joints and MIG for structural frame welds.
- Back-Purge & Purge Gas: When welding stainless or chrome-plated parts (e.g., some spark plugs), back-purge with argon to prevent oxidation beneath the weld.
9.2 Jigs & Fixtures for Repeatability
- Custom Wood or Aluminum Jig: Build a simple L-shaped jig to hold axle rods perfectly parallel. This ensures your front and rear wheels have identical track width, eliminating “dog-tracking” when rolling.
- Magnetic Clamping Squares: Helpful for holding small metal plates and brackets at perfect 90° angles during tack welding.
9.3 Kinetic Elements & Interactivity
- Working Suspension: Install springs between the main C-clamp jaws and base clamps. By selecting springs of appropriate tension, your miniature tractor can “bounce” when tapped, adding playful movement.
- Rotating Wheels: Instead of fixed axles, mount wheels on flanged bearings or bronze bushings so they spin freely. Small skateboard bearings press-fit into wheel hubs work beautifully.
9.4 Texturing & Weathering
- Hammer Texture: Lightly peen flat metal panels (seat, fenders) with a ball-peen hammer before painting to create dimpled highlights.
- Layered Patina: After base coat, apply a contrasting top coat (e.g., orange over green), then wet-sand key edges to reveal the undercoat, simulating decades of paint chipping.
9.5 Magnetic & Modular Components
- Magnetic Engine Cover: Glue rare-earth magnets to the underside of a sheet-metal “hood” so it snaps onto the spark-plug bank—allowing viewers to peek inside.
- Interchangeable Tools: Design the rear hitch as a removable C-clamp–style accessory that can hold a tiny plow, trailer, or log fork made from additional hardware.
10. Troubleshooting Common Challenges
| Issue | Possible Cause | Solution |
|---|---|---|
| Wheels not aligned | Bent axle rod or uneven clamps | Straighten rod in a vise; shim clamp seats with washers |
| Springs creeping | Incorrect spring rate or orientation | Swap to stiffer springs; reverse coil direction |
| Weld burn-through | Excessive current or thin metal | Reduce amperage; tack-weld in short bursts; add backing |
| Paint cracking at welds | Poor surface prep or incompatible paint | Sandblast around welds; use high-adhesion industrial primer |
| Sculpture tipping over |
The C-clamp tractor stands at the intersection of utility and artistry, revealing how everyday workshop relics can be elevated into captivating sculptures. From the initial spark of inspiration—combining clamps, springs, and spark plugs—through meticulous construction, finishing, and display, this project celebrates resourcefulness and creative expression. Whether you’re an experienced metalworker or a curious upcycler, building your own C-clamp tractor offers an opportunity to transform industrial castoffs into a timeless conversation piece.
Whether you’re a seasoned welder or brand new to fabrication, the C-clamp tractor offers an accessible yet richly rewarding canvas. Embrace the quirks of each salvaged component, lean into happy accidents during welding, and above all, share your creations with others. In doing so, you’ll not only craft a striking industrial sculpture but also inspire fellow makers to see beauty in the hardware that surrounds us every day.
Embrace the challenge, experiment with materials, and let your C-clamp tractor become a testament to the transformative power of recycled art. Happy building!


