
Creating a floor that looks like a tranquil koi pond or a crystal-clear water garden is one of the most breathtaking interior design trends of the decade. Homeowners, designers, and creative property owners are turning to bold, nature-inspired surfaces that transform rooms into immersive experiences. Among the most striking options available today, Epoxy Pond Floors stand at the top—bringing serene water illusions, lily pads, lotus flowers, and shimmering blue depth directly into your living space.
As 2026 approaches, the demand for Epoxy Pond Floors is rising faster than ever. People want unique floors that combine artistry, durability, and modern luxury. Whether you’re renovating a living room, building a spa retreat, or designing a boutique business interior, this flooring style offers unmatched visual impact paired with long-term performance.
This complete guide explores everything you need to know—how pond epoxy flooring are installed, what materials you’ll need, the step-by-step process, maintenance expectations, and a detailed 2026 cost breakdown to help you budget confidently.
What Are Epoxy Pond Floors? Understanding the Concept
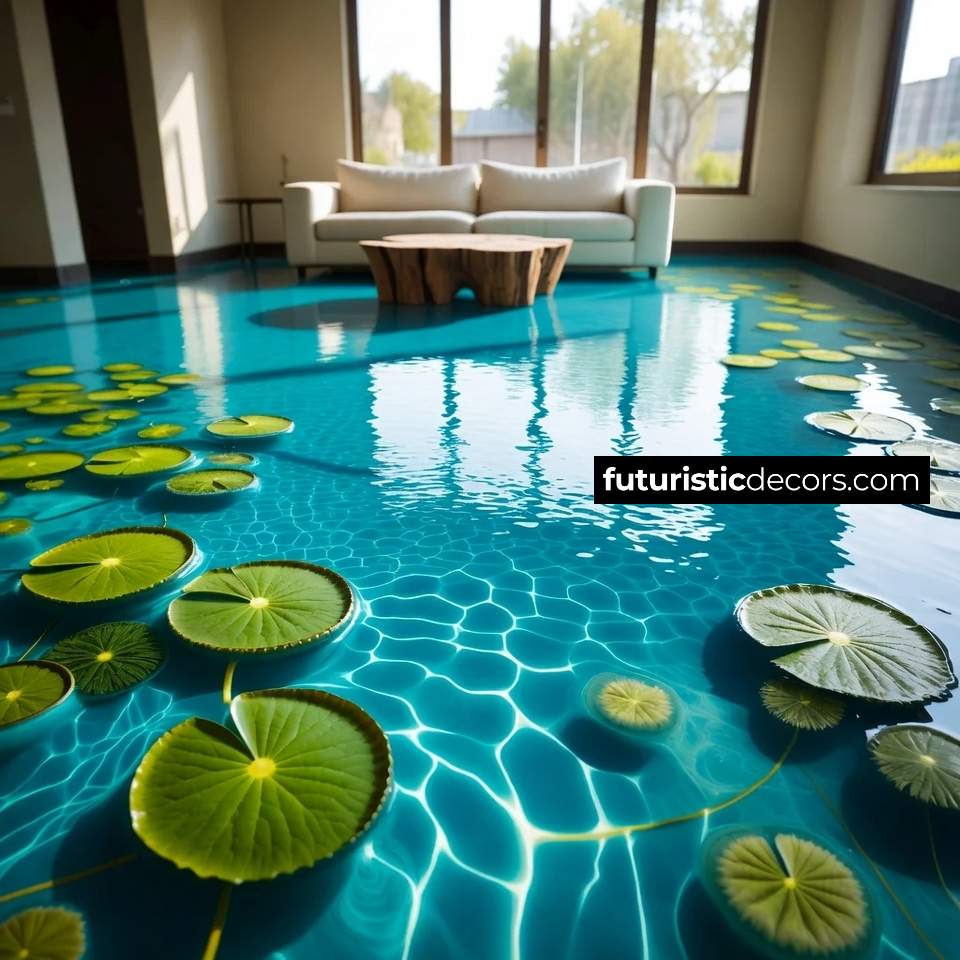
Epoxy Pond Floors are high-end 3D epoxy resin installations designed to replicate the look of a calm, natural pond. By layering glossy resin with custom artwork, embedded textures, and translucent color effects, installers create stunning floor illusions that mimic depth, movement, and watery reflections.
The surface is smooth, durable, waterproof, and visually immersive—turning your home or business into a breathtaking landscape.
Most designs include lush elements such as:
- Floating lily pads
- Green lotus leaves
- Floral details
- Subtle water ripples
- Shimmering blue or teal backgrounds
- Koi fish artwork (optional)
The result is a calming environment that elevates modern interiors and makes the floor feel alive.
Why Homeowners Love Epoxy Pond Floors in 2026?
Home design trends for 2026 heavily favor nature-inspired luxury, and Epoxy Pond Floors perfectly capture this movement. Their appeal comes from a combination of artistic expression and practical advantages.
1. Aesthetic Impact: These floors instantly become the centerpiece of any room. Whether placed in a living room, spa bathroom, resort, or office lobby, they command attention with depth and realism.
2. High Durability: Epoxy is extremely strong, resisting scratches, stains, moisture, and foot traffic. Perfect for both residential and commercial environments.
3. Low Maintenance: Unlike wood or tile floors that require constant care, Epoxy Pond Floors clean easily with simple mopping and mild detergents.
4. Custom Design Opportunities: Every installation is one-of-a-kind. You can choose water shades, lily pad styles, koi fish patterns, and subtle lighting effects to personalize your space.
5. Long Lifespan: With proper installation, epoxy flooring lasts 15–25+ years, making it a smart long-term investment for beautiful interiors.
Refer to buy similar products: Click here
Where Epoxy Pond Floors Work Best
Thanks to their waterproof properties and striking visuals, Epoxy Pond Floors thrive in many environments:
- Living rooms
- Bathrooms
- Spa rooms
- Yoga studios
- Entryways
- Resorts and hotels
- Airbnb rentals
- Restaurants
- Office lobbies
Because the design gives the illusion of natural water, locations with good lighting—especially floor-to-ceiling windows—look exceptionally stunning.

How Epoxy Pond Floors Are Made: Step-by-Step Installation Guide
Installing Epoxy Pond Floors is a meticulous artistic process. While some experienced DIY enthusiasts attempt small spaces on their own, most homeowners hire professional epoxy artists for flawless results. Below is the complete installation sequence used in 2026 to achieve the highest quality finish.
Step 1: Floor Preparation
A perfect epoxy installation begins with thorough preparation. The existing surface must be:
- Dry
- Level
- Clean
- Free of cracks
- Free of oils or old glue
Contractors typically:
- Grind the concrete surface
- Repair cracks
- Vacuum dust
- Apply moisture tests
If you’re installing over tiles, additional grinding or a self-leveling compound may be required to ensure a smooth base.
Preparation Time: 3–8 hours depending on the floor condition.
Step 2: Primer Application
Once the surface is clean and prepped, the first layer of primer is applied. The primer:
- Helps epoxy bond securely
- Seals pores in the concrete
- Prevents bubbles during curing
Most artists use clear or lightly tinted primers depending on the color scheme of the pond design.
Primer Drying Time: 6–10 hours.
Step 3: Creating the Pond Background Layer
This is where the magic begins. The background layer determines the final depth and color tone of the floor. Designers swirl shades of:
- Aqua blue
- Teal
- Navy
- Emerald green
- White resin accents
These colors mimic natural water variations. Light, soft gradients create a shallow-pond look, while darker gradients achieve deep-water illusions.
This artistic step can take several hours because the resin must be applied smoothly before it begins to cure.
Step 4: Adding 3D Pond Artwork
Once the base water layer is cured, artists add the pond elements. This may include:
- Photorealistic lily pad decals
- Painted flowers
- Embedded leaves
- Printed koi fish motifs
- Lotus flower artwork
- Layered resin illustrations
High-grade vinyl decals are often used for realism. Some installers hand-paint additional depth or shading using translucent pigments to enhance the natural appearance.
This layer is what gives pond epoxy flooring their immersive beauty.
Step 5: Encapsulation Layer (Clear Epoxy)
After the artwork is positioned and secured, a thick layer of crystal-clear epoxy is poured over the design. This layer:
- Protects the artwork
- Adds a glass-like finish
- Creates the illusion of water
- Increases floor depth
- Enhances shine and clarity
Most high-end installations use multiple layers of clear epoxy for enhanced durability.
Curing Time per Layer: 12–24 hours.
Step 6: Optional 3D Depth Enhancements
Artists can create additional visual depth by adding soft shadows, ripple effects, or highlighted edges before pouring the final layer. This subtle detailing elevates the realism dramatically.
This optional step is often chosen for luxury installations and spa environments.
Step 7: Final Topcoat for Protection
The final step involves sealing the entire surface with a UV-resistant polyurethane topcoat. This protective finish:
- Prevents yellowing
- Increases scratch resistance
- Improves slip resistance
- Extends floor lifespan
Matte, satin, or glossy finishes are available depending on your preferred aesthetic.
Topcoat Curing Time: 24 hours for light use, 72 hours for full use.

Cost Breakdown for Epoxy Pond Floors in 2026
The cost of Epoxy Pond Floors has increased slightly for 2026 due to higher resin prices and rising demand for custom floor artistry. However, pricing remains competitive compared to other luxury flooring types.
1. Base Cost per Square Foot (2026 Pricing)
| Installation Quality | Price per sq ft |
|---|---|
| Standard Design | $22 – $32 |
| Custom Pond Graphics | $32 – $45 |
| High-End 3D Artwork + Multi-Layer Resin | $45 – $60 |
Most homeowners choose mid-range custom pond designs, which offer a great balance of depth and realism.
2. Total Cost for Average Room Sizes
| Room Size | Estimated 2026 Cost |
|---|---|
| Small Room (100 sq ft) | $2,800 – $4,000 |
| Medium Room (200 sq ft) | $5,200 – $8,000 |
| Large Living Room (350 sq ft) | $9,200 – $15,000 |
| Luxury Installations (400+ sq ft) | $15,000 – $25,000+ |
3. Additional Cost Factors
Several elements affect final pricing:
- Surface Preparation: Old floors with cracks or unevenness require additional labor. Added Cost: $200 – $800
- Complex Artwork: Including koi fish, lotus flowers, or premium 3D decals increases material cost. Added Cost: $300 – $1,500
- Extra Clear Epoxy Layers: More layers equal greater clarity and durability. Added Cost: $4 – $10 per sq ft
- High-Traffic Area Coatings: Restaurants and commercial spaces usually require heavier protective finishes. Added Cost: $500 – $2,000 depending on size
DIY vs Professional Installation in 2026
Many homeowners wonder if they can install Epoxy Pond Floors on their own. While basic epoxy coatings can be DIY-friendly, 3D pond designs require precision, artistic skill, and professional equipment. The margin for error is extremely slim, and mistakes are costly.
DIY Considerations
- Resin must be mixed perfectly
- Air bubbles can ruin the water effect
- Artwork placement requires experience
- Dust or humidity can affect curing
- Floors need perfect leveling
Professional Advantages
- Guaranteed smooth surface
- Perfectly applied gradients
- Long-term durability
- Accurate artwork layering
- Faster curing and installation
- Warranty included
For most homeowners, professional installation is the best choice, especially for large living spaces.
Maintenance Guide for Epoxy Pond Floors in 2026
One of the biggest advantages of Epoxy Pond Floors is how easy they are to maintain. Their seamless, glossy surface stays beautiful for years with minimal effort.
Daily Care
- Sweep or dust mop to remove debris
- Avoid abrasive tools
Weekly Cleaning
- Mop with warm water and mild soap
- Avoid acidic or bleach cleaners
Long-Term Care
- Add protective pads under heavy furniture
- Reapply topcoat every 4–6 years if desired
- Buff out micro-scratches if needed
Stain Resistance
Epoxy is non-porous, making it resistant to:
- Water
- Pet stains
- Wine
- Oils
- Dirt and grime
This makes the floor perfect for homes with children, pets, and high foot traffic.
Design Options for Epoxy Pond Floors in 2026
You can customize every aspect of your pond floor to match your interior style. Popular design variations include:
1. Lotus Flower Pond Theme
Soft greens, deep blues, and lily pads with delicate pink blooms.
2. Clear Tropical Pond
Bright turquoise water with minimal artwork for ultra-modern homes.
3. Koi Fish Pond Floor
Realistic or artistic koi patterns embedded into the resin.
4. Nature Spa Theme
Muted greens, deep earth tones, and stone accents—a favorite for massage studios.
5. Illuminated Pond Flooring
LED lighting added around edges for stunning nighttime reflections.
Each design brings a different character to your living space, making your floor a true work of art.
Benefits of Choosing Epoxy Pond Floors Over Other Luxury Flooring
When comparing Epoxy Pond Floors to other high-end flooring options like marble, terrazzo, or luxury vinyl, epoxy offers distinct advantages.
1. Better Customization
No two epoxy pond floors are ever alike. You get full control over the design.
2. Seamless Surface
Unlike tile or wood, epoxy is a smooth slab without gaps or grout lines.
3. Superior Durability
Epoxy handles impacts, spills, and movement better than most flooring types.
4. Artistic Appeal
Few flooring choices offer the same dramatic, nature-inspired look.
5. Lower Long-Term Cost
Because epoxy lasts decades without major maintenance, it becomes cost-effective over time.
Refer to similar product models: Click here
Conclusion: “Transform Your Space with Epoxy Pond Floors in 2026”
As 2026 ushers in a new era of creative interior design, pond epoxy flooring continue to stand out as one of the most mesmerizing and forward-thinking flooring solutions. They merge art, nature, and high-performance materials into a single luxurious installation—bringing a calm, water-inspired aesthetic into modern living rooms, spas, businesses, and creative spaces.
Whether you’re captivated by vivid turquoise water, realistic lily pads, lotus blossoms, or smooth reflections that mimic rippling ponds, your floor becomes a living masterpiece. These floors aren’t just functional—they’re transformative. They create emotion, add visual depth, and elevate your environment with a sense of peace and luxury.
With the detailed installation guide and full 2026 cost breakdown above, you now have everything you need to plan your dream pond-inspired flooring project confidently. Choosing Epoxy Pond Floors means embracing a design that stays beautiful for decades, captivates every visitor, and gives your space a modern, artistic personality found nowhere else.


