
There’s something truly mesmerizing about the marriage of Illuminating Wood Countertops — where the warmth of natural timber meets the brilliance of integrated LED lighting. This design trend has taken modern kitchens by storm, transforming everyday countertops into glowing masterpieces that redefine atmosphere and functionality. Whether you’re crafting a rustic mountain kitchen, a sleek urban loft, or a luxurious eco-home, illuminated wooden surfaces elevate the space into something extraordinary.
Beyond aesthetics, these countertops also serve a practical purpose: they improve visibility during evening hours, act as subtle night lights, and create a mood that shifts with the touch of a dimmer or app control. But to achieve that flawless glow, homeowners and designers must understand the right materials, proper installation techniques, and the best LED lighting options.
This comprehensive guide walks you through every detail — from choosing wood types to embedding LED strips — ensuring your Illuminating Wood Countertops shine beautifully for years to come.
What Makes Illuminating Wood Countertops Unique?
At their core, Illuminating Wood Countertops combine craftsmanship and technology. They feature live-edge or flat-cut hardwoods embedded with LED channels that run like glowing rivers through the surface. The interplay of light and natural grain patterns creates a breathtaking contrast, almost as if the countertop itself were alive.
These designs are not merely decorative. They reflect innovation in material science and artistic imagination:
- Epoxy resin integration: LED lights are often sealed within transparent epoxy resin, providing protection while diffusing the glow.
- Customizable light color: From calming amber tones to bold RGB effects, users can tailor the light mood to suit any occasion.
- Smart controls: Many setups connect to smart home systems or mobile apps for seamless control over brightness and color temperature.
In short, these countertops embody functional art — a fusion of organic warmth and futuristic design.
Choosing the Right Wood for the Job | Wood Countertops
Selecting the ideal wood species is crucial to the longevity and appearance of Illuminating Wood Countertops. Not all woods react the same way to heat, moisture, or light diffusion.
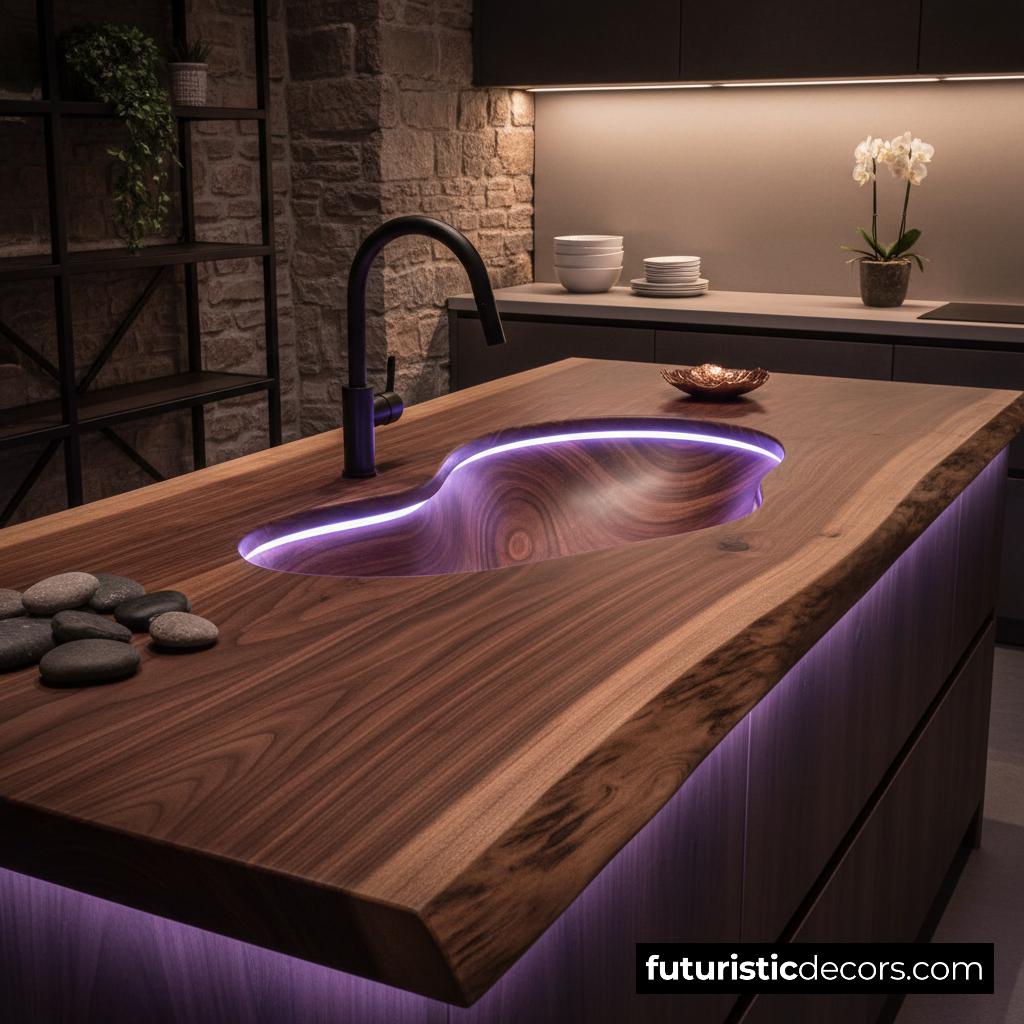
Black Walnut
Rich, dark, and luxurious — black walnut enhances the vibrancy of internal lighting. Its deep tone contrasts beautifully against warm LEDs, making it a favorite for high-end kitchens.
White Oak
Known for durability and neutral undertones, white oak pairs well with both warm and cool lighting. Its subtle grain pattern allows LED effects to stand out without overpowering the design.
Maple
Maple’s fine, even texture creates a clean, modern look. It’s perfect for homeowners seeking a minimalistic design with soft white or blue light accents.
Teak
Naturally resistant to moisture and decay, teak works wonderfully in kitchens and bathrooms where humidity may fluctuate. Its golden hue glows harmoniously under warm LED tones.
Reclaimed or Live-Edge Wood
For eco-conscious projects, reclaimed timber or live-edge slabs offer character and sustainability. The LED illumination can highlight cracks, knots, and grain patterns for a one-of-a-kind result.
Pro Tip: Always seal and finish your countertop with UV-resistant epoxy or polyurethane to protect the wood and prevent discoloration caused by LED heat exposure.
LED Lighting Options: Finding Your Perfect Glow
The lighting component is the heart of Illuminating Wood Countertops. Selecting the right LED type defines both the ambiance and performance of the design.
LED Strip Lights
The most popular option — these flexible strips fit easily into routed channels beneath the wood or within epoxy inlays. They offer adjustable brightness and are available in various color temperatures (2700K for warm, 5000K for cool).
RGB and RGBW LED Systems
If you crave versatility, RGB (Red, Green, Blue) or RGBW (with added white diode) strips let you change the countertop’s color scheme via remote or app. Perfect for modern smart homes or entertainment-centric kitchens.
Diffused Epoxy LEDs
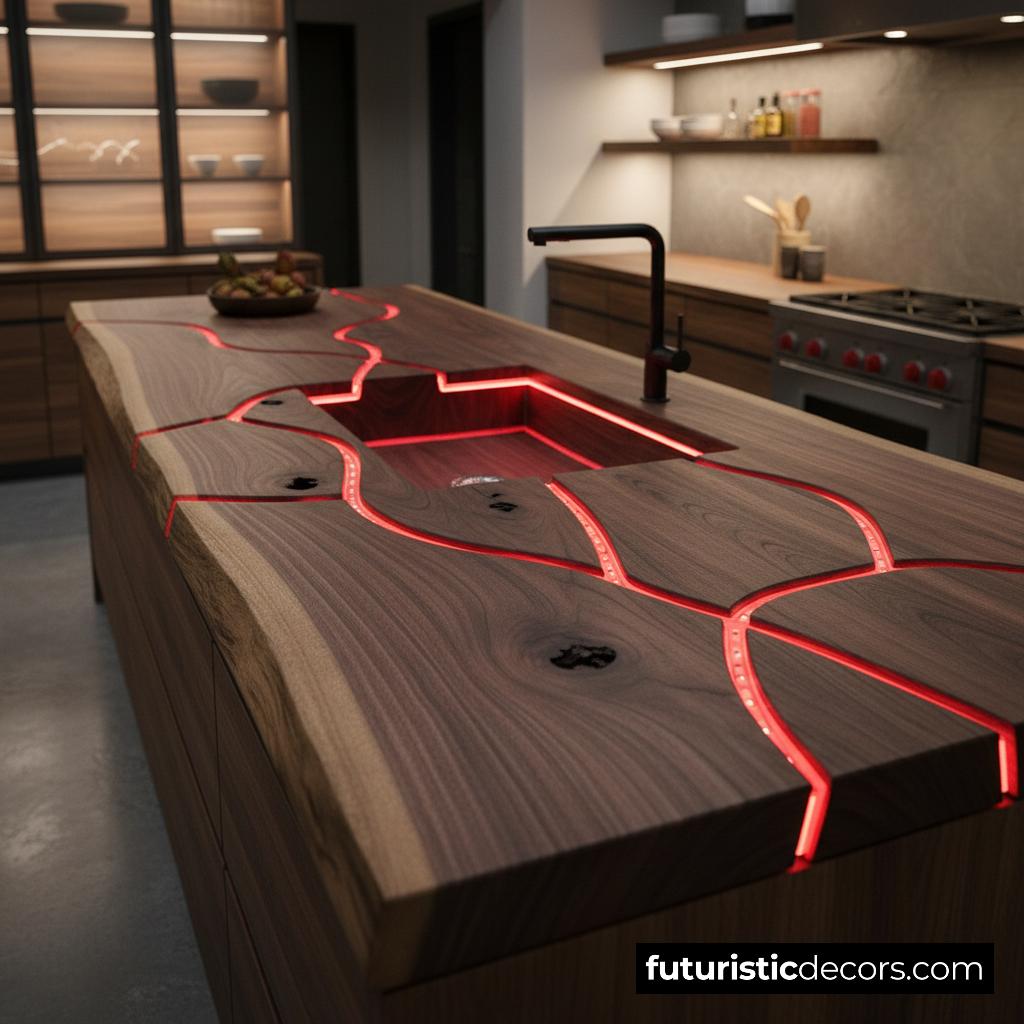
In some high-end designs, LEDs are encapsulated in translucent epoxy resin. This technique produces a “lava-flow” effect, where the light softly fades across the surface, offering depth and texture.
Edge-Lighting Systems
Ideal for minimalists, this technique illuminates the perimeter of the countertop instead of cutting into the wood. It produces a subtle halo effect, enhancing the countertop’s floating appearance.
Bonus Idea: Pair LED lights with motion sensors or timers — your countertop can glow softly when you enter the room or dim automatically when you leave.
Installation Tips: Illuminating Wood Countertops
Bringing Illuminating Wood Countertops to life is a rewarding process that blends craftsmanship, precision, and creativity. While the glowing light channels may look effortless, achieving that smooth, professional finish requires careful planning and execution. Here’s a step-by-step guide to help you transform your countertop into a functional work of illuminated art.
Step 1: Designing Your Lighting Layout
Before making any cuts, sketch your lighting path. This design phase determines the overall look and mood of your countertop.
- Plan natural flow: Curved lines or river-like channels feel organic and complement the natural grain of the wood.
- Choose lighting zones: Decide whether the illumination will highlight a sink area, run along the edges, or flow through the center.
- Balance aesthetics and function: Avoid excessive lighting that overwhelms the natural wood tone—subtlety often creates the most elegance.
Pro Tip: Use painter’s tape to outline your LED paths on the countertop before cutting to visualize how the final glow will appear in your space.
Step 2: Routing the Light Channels
With your design finalized, it’s time to create the channels where the LED strips will be installed.
- Use a plunge router to carve shallow channels (¼ inch deep is ideal) along your planned paths.
- Keep consistent depth to ensure even light diffusion and avoid hotspots.
- Smooth the edges of your channels with fine-grit sandpaper to prevent damage to the LED strips.
Tip: Test-fit the LED strips in the routed channels before final placement to confirm width and curvature alignment.
Step 3: Installing the LED Strips
Once the channels are prepared, carefully position your LEDs:
- Clean the channels to remove dust and debris for better adhesion.
- Apply thermal adhesive tape or silicone sealant to secure the strips and aid heat dissipation.
- Avoid sharp bends in the strip, as they can weaken or break the light circuit.
- Check uniform spacing to maintain even brightness throughout the design.
Tip: For corners or curves, use flexible LED strips with high bend tolerance. These adhere better and create a continuous line of light.
Step 4: Encasing with Epoxy Resin
Encapsulating your LED lights not only enhances durability but also produces that mesmerizing, glass-like glow effect.
- Mix clear or tinted epoxy resin according to manufacturer instructions.
- Pour slowly into the channels to prevent air bubbles.
- Use a heat gun to gently eliminate trapped air.
- Allow 24–48 hours of curing time for a smooth, durable surface.
If you want a “river” or “lava” appearance, use tinted resin that diffuses light softly through the wood’s grain, giving your countertop a dynamic, sculpted glow.
Step 5: Electrical Connections and Power Setup
Proper wiring ensures both functionality and safety.
- Connect the LED strips to a compatible low-voltage power supply (typically 12V or 24V).
- Integrate a dimmer or smart control module to adjust brightness and color settings.
- Hide wiring within cabinetry or beneath the countertop for a seamless look.
- Follow local electrical codes or hire a certified electrician for installation if you’re unsure.
Tip: If you’re using RGB or smart LEDs, position the control box where it’s easily accessible for maintenance and Wi-Fi signal reach.
Step 6: Finishing and Sealing the Surface
Once your lighting is secure and functioning, it’s time to finish your countertop:
- Sand the entire surface with progressively finer grit sandpaper (120 to 400) for a silky texture.
- Apply a UV-resistant polyurethane or matte epoxy coating to protect the wood and enhance its natural tone.
- Avoid glossy finishes if you want to reduce glare from LED reflections.
Run the lights after finishing to ensure everything glows evenly and beautifully.
Step 7: Testing and Final Adjustments
Before declaring your project complete, perform a few crucial checks:
- Power on the LEDs and inspect for uneven brightness, dead sections, or flicker.
- Look for epoxy imperfections or areas that need light sanding and re-polishing.
- Check for heat buildup after running the lights for several hours.
Once everything checks out, sit back and enjoy your new masterpiece — a radiant countertop that doubles as a glowing work of art.
Illuminating Wood Countertops: Materials & Accessories You’ll Need
To achieve a flawless finish, gather the following materials before beginning installation:
- Hardwood slab (2–3 inches thick)
- LED strip lights (12V or 24V recommended)
- Power supply and dimmer or smart controller
- Clear or tinted epoxy resin
- Router and bits for channeling
- Sandpaper (120 to 400 grit)
- Polyurethane or UV-resistant wood sealant
- Heat-resistant silicone or thermal adhesive tape
- Wire connectors and insulation sleeves
Having all these components ready ensures a smooth workflow and professional results.
Design Inspirations and Aesthetic Combinations
Modern interior designers are experimenting with Illuminating Wood Countertops in breathtaking ways. Here are some ideas to inspire your project:
The “Lava Flow” Kitchen Island
A dark walnut slab embedded with red and orange LEDs mimics molten lava — ideal for bold, dramatic spaces.
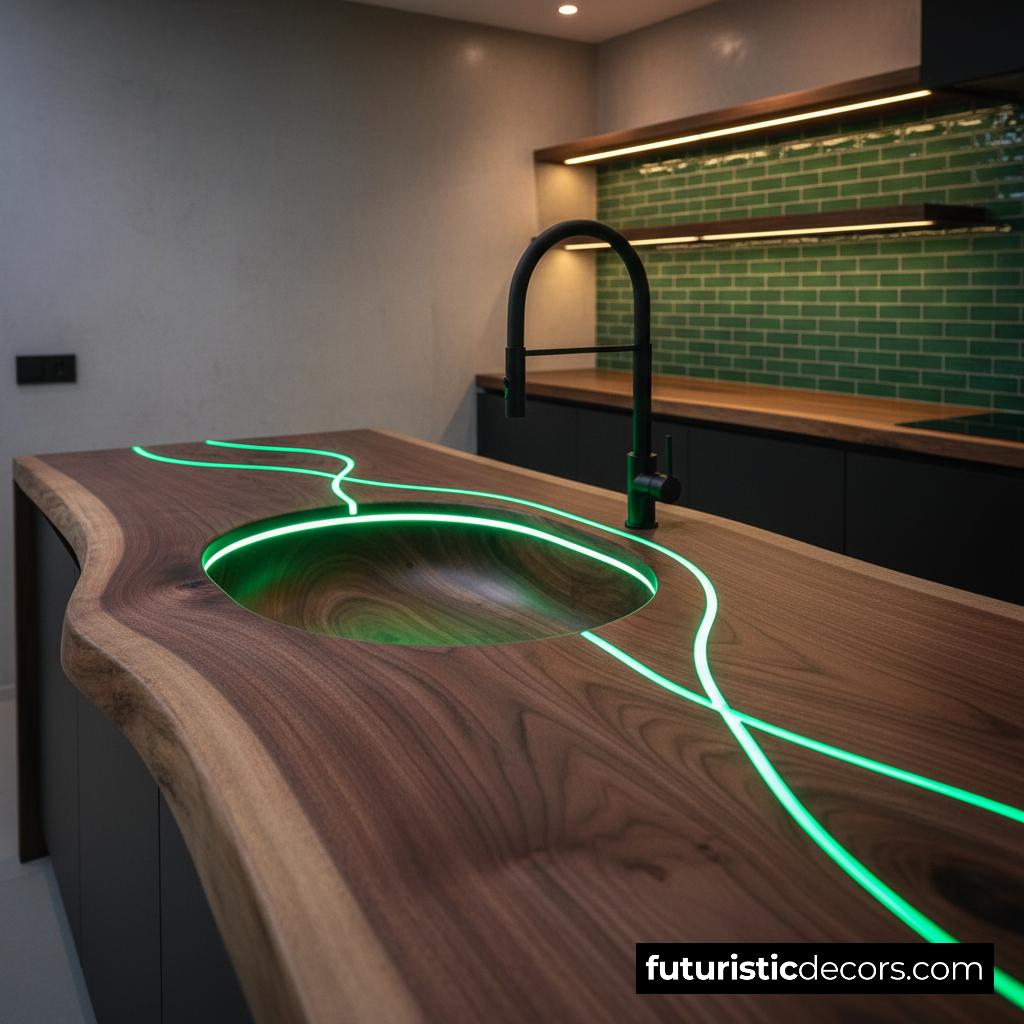
River of Light
Using blue or turquoise LEDs within clear epoxy gives the illusion of water streaming across the surface. Perfect for coastal or nature-inspired homes.
Minimal Glow Perimeter
For subtle luxury, use edge lighting that outlines the countertop shape, emphasizing its geometry without overwhelming the decor.
Rainbow Smart Counter
Install RGB LED systems for full-spectrum lighting. You can shift hues depending on your mood or event — from serene dinner ambiance to vibrant party lighting.
Nature Meets Modern
Combine live-edge slabs with warm amber lighting beneath plant shelves or stone backsplashes to balance rustic texture and futuristic mood.
Price Range & Cost Considerations: Illuminating Wood Countertops
Pricing varies widely based on materials, lighting complexity, and labor. Here’s a general breakdown:
- Standard hardwood countertop: $80–$150 per square foot
- LED integration with epoxy: $200–$400 per square foot
- Smart lighting system upgrade: Additional $150–$300 for controllers and programming
- Professional installation: $800–$1,500 depending on customization
While the initial investment may seem high, the visual impact and uniqueness justify the cost. Few kitchen features make such a bold statement while remaining functional.
Link to buy similar products: Click here
Conclusion: The Future of Natural Elegance
Illuminating Wood Countertops represent more than a design trend — they symbolize the evolution of how we perceive everyday living spaces. By merging organic textures with the artistry of light, these countertops transform kitchens into living sculptures. Every glow, every grain tells a story of craftsmanship, innovation, and natural beauty.
Whether you choose subtle under-lighting or dramatic river-epoxy illumination, these creations deliver atmosphere, emotion, and luxury in equal measure. They’re not just countertops — they’re centerpieces that breathe life into your home. Invest in this glowing masterpiece, and watch your kitchen transform into a radiant sanctuary of design and warmth.


